- Bulk delivery: Send codes to a specific customer segment in one go.
- Segment updates: Automatically deliver codes when a customer enters or exits a defined segment.
- Event-based responses: Send codes in reaction to an outstanding order or any custom event.
- Re-engage inactive customers: Identify customers who have not visited your store for a while and incentivize them with a discount coupon.
- *Exclusive redemption: Ensure that only the recipient of the voucher can redeem it, maintaining exclusivity and preventing misuse.
- *Personalized delivery: Send tailored coupons to customers via email, creating a more engaging and targeted experience.
Setting up the integration in Voucherify
Generate API integration keys for CleverTap.- Go to Project Settings and scroll to Integration Keys in the General tab.
- Click the plus button on the right.
- Fill in the Name for your key.
- Choose your role from the Role drop-down list.
- Choose CleverTap from the Integration drop-down list.
- Click the Create Integration API Key button.
How to distribute Voucherify’s unique coupons with CleverTap
Follow these steps to distribute coupons.Step 1: Prepare a Voucherify campaign to engage inactive customers
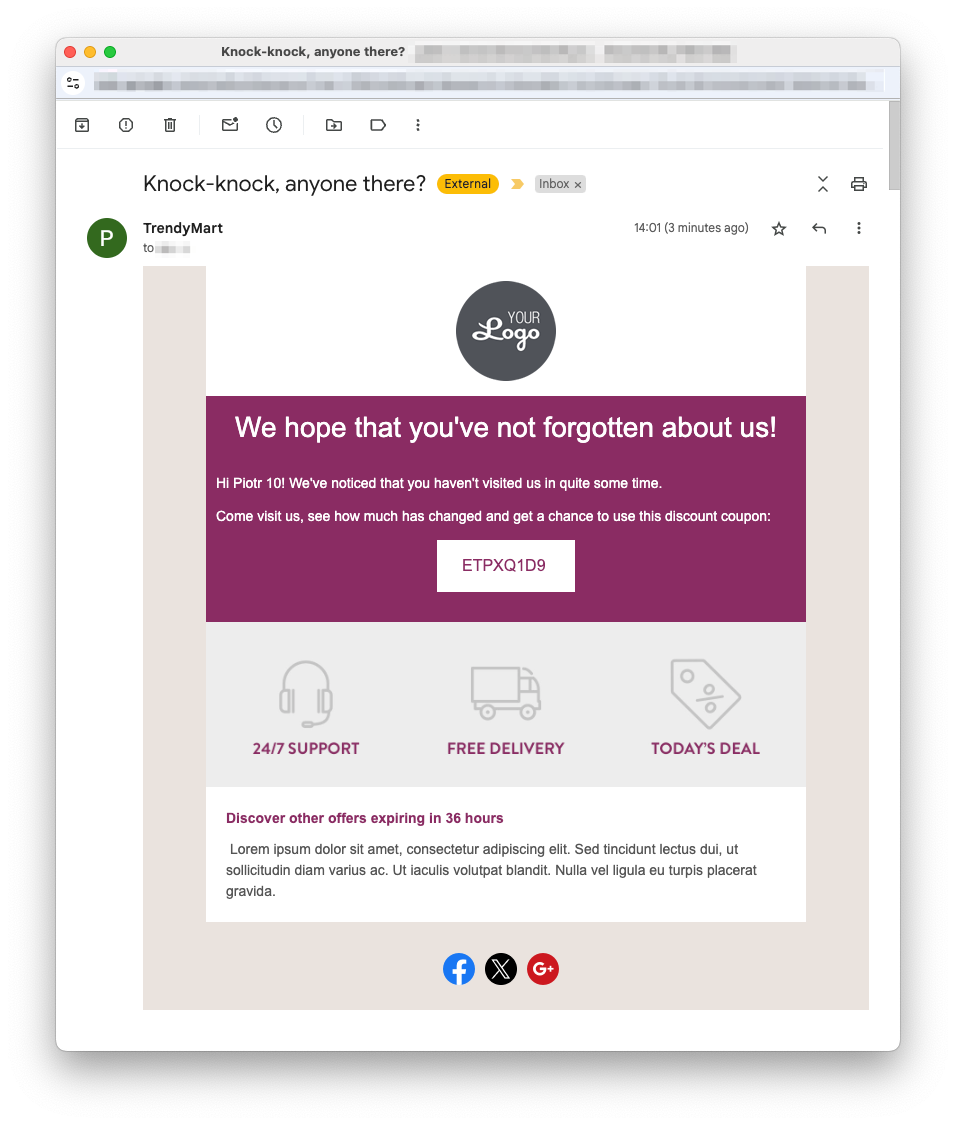
In this example, a unique coupon campaign called Customer Reactivation” is implemented. This campaign offers a 20% discount on the entire cart, with a maximum discount value of $100. The key setting in this campaign is the “Customers will be allowed to join the campaign only once” option.- When enabled: Each customer will receive only one code from the campaign. If the customer tries to request another code, the system will provide the original code they initially received.
- When disabled: The customer will receive a new coupon code every time a request is made.
Step 2: Configure a CleverTap Linked Content endpoint, which will publish a new code from the campaign
In your CleverTap account, go to Settings > Setup > Linked Content and select the + Linked Content button. A Linked Content form will appear. Fill it in the following way:- API Name: this is the name of the Linked Content endpoints. In this case, it is named New Reactivation Voucher because it will send out voucher codes from the Customer Reactivation campaign.
- API URL: type in the address of the Create Publications endpoint:
{{API_URL}}/v1/publications/create?campaign=[Voucherify campaign ID]&customer={{customersourceid}}. You can find your API URL in your Voucherify Project Settings in the Application Information section under the API endpoint. - In the Parameters tab, a customersourceid parameter will appear. Check the Mark mandatory checkbox, as without the customer ID, a coupon cannot be assigned to the customer.
- In the Headers tab:
- Add
X-App-IdandX-App-Tokenheaders you have generated earlier in Voucherify - Set Content-Type header to
application/json.
- Add
voucher.code field will be needed – it contains the published code.
Step 3: Use the Linked Content endpoint in a CleverTap campaign
Create a new CleverTap campaign. In this example, set up a one-time email outbound campaign targeting customers who last visited an e-commerce site 30 days ago. Prepare the email content. CleverTap supports the use of Liquid tags to dynamically insert details, such as the customer’s name, into the email content. This triggers the Linked Content endpoint configured in Step 2. The endpoint response is then parsed to display the appropriate details to the recipient. To use Voucherify’s create publication endpoint and generate a new code for the email recipient: Add the configured Linked Content endpoint to the campaign using the Personalization Setup. Specify the field to be used as the request parameter for the endpoint. In the place where you want the coupon code to be displayed, choose Customize with Liquid tags and choose the code field from the Linked Content endpoint created in Step 2.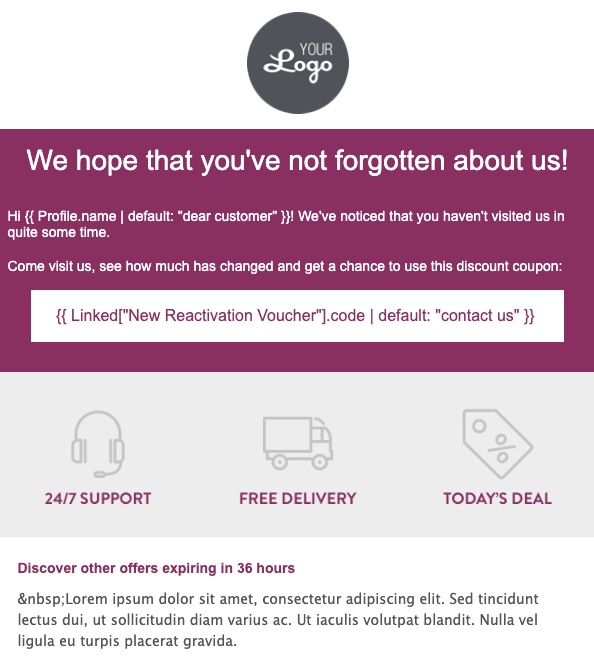
/v1/publications/create.
You can also view the generated codes in the selected campaign dashboard in the Vouchers tab.
Other scenarios
Referral code and loyalty card publication
The process of assigning a referral code or loyalty card is similar to the one described above. All you need to do is change the campaign name parameter to the referral or loyalty campaign you created. In this example, the customer’s code is retrieved from the referral program by using campaign ID. If the Customer is allowed to join the campaign only once (the option is enabled in the referral program configuration), a customer who is already part of the program will receive their previously assigned referral code. If a referral code has not yet been assigned to the customer, a new code will be generated and included in the response. First, configure the Linked Content endpoint. Then, to retrieve the loyalty card, use the following code:{{ Linked["Customer Referral Code"].code }}.
The customer can share their referral code with a friend. When they use it during a purchase, the referrer will be awarded the gift you have set up in the Voucherify Dashboard.